Looking to know how to build a kitchen island? As the heart of the home, kitchens require careful planning, especially when building a center island. It might seem like an intimidating task, but creating your kitchen island is entirely attainable with a bit of patience and the right materials. This DIY project offers great functional and aesthetic advantages for your kitchen.
In this step-by-step guide, we’ll explain how to construct your own kitchen island from scratch, using maple plywood for the base, melamine for the bottom compartment, and elegant solid cherry for the top.
Table of Contents
Materials required:
- Half-inch Maple Plywood
- 5/8-inch Melamine
- Solid Cherry
- Solid Wood (for trim and brackets)
- Biscuits and Glue
- Water-Based Polyurethane
- Electric Hand Plane
- Orbital Sander
- Table Saw
- CNC (for Dutchman)
- Ash and Black Walnut (for Dutchman)
- Boiled Linseed Oil
Steps to How to Build a Kitchen Island
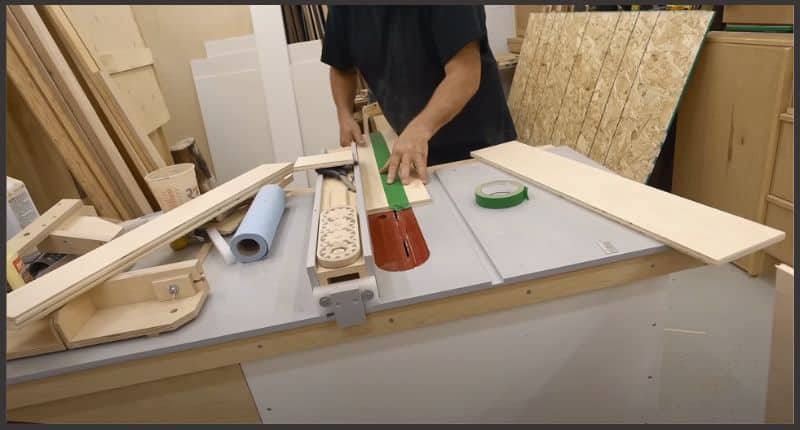
- Start with the toe kick, cut from half-inch maple plywood. Ensure to clean any dirt or grain off the plywood using an orbital sander with a 220-grit disc.
- If the pieces aren’t long enough, extend them using biscuits and glue. Set back the ends by an inch using a spacer and secure the toe kick using inch-and-a-half brads.
- Next, cut additional internal base pieces to angle them out for easier cleaning, avoiding creating a 90-degree corner.
- Create ‘Outriggers’ that go down to the floor to close up the gap at the backside of the legs of the island.
- Spray three coats of water-based polyurethane on the base for a smooth finish.
How to Install the Cabinets:
- Use careful measurements to locate the base on the kitchen floor. Typically, blocks are glued down to the floor to hold the base; drilling is not advised for ceramic tiles.
- Seal around the base; then install the 5/8-inch melamine cabinet bottom.
- Next, install the pre-cut, pre-finished half-inch maple plywood as front and side panels. Fasten these in place with glue and inch-and-a-half brads.
Creating and Installing the Trims and Brackets:
- Cut the half-inch plywood into strips under three inches wide and pre-finish with three coats of water-based polyurethane. This is for the style and rails of the panels.
- Make solid wood trim to go around the inside of the panels.
- Cut, sand, and glue bracket pieces together from solid wood. The glued brackets are then clamped in place first, and once the glue dries, long screws are driven in to reinforce it.
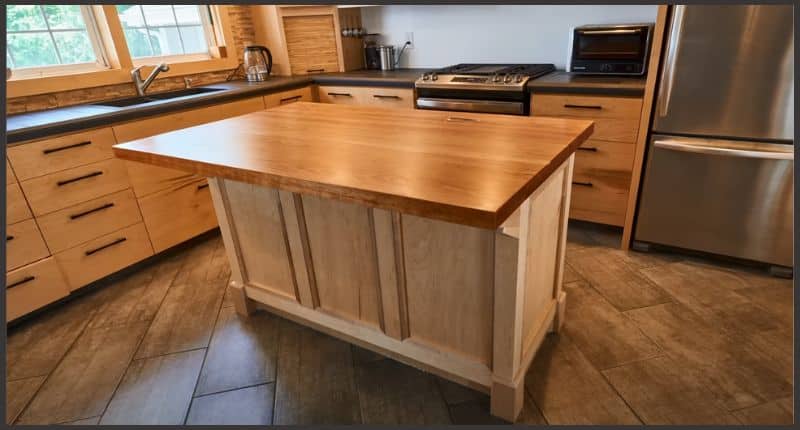
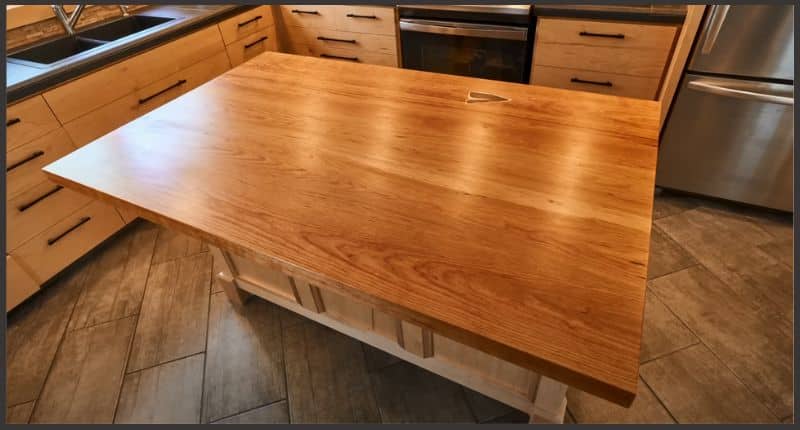
The Top of the Island:
- Cut your solid cherry into lengths and flatten the pieces with an electric hand plane, followed by a thickness planer.
- Ensure the edges are straight by using a fence when cutting. Once all the edges are straight, join the pieces together using glue.
- To add a personal touch to the island, you could cut out a template for a Dutchman, in this case, a T-bone steak, using ash for the bone and black walnut for the red meat. Fit this into a routed pocket in the top of your island.
- Finally, sand the top and bottom of your island and add coats of boiled linseed oil, sanding lightly between coats for a beautiful finish.
Building your own kitchen island is a rewarding project that adds value to your home while showcasing your DIY skills. It may require patience and careful detailing, but the end result is certainly worth the time and effort. Happy building!
Concept Two
Planning and Design: How to Build a Kitchen Island
- Determining the size and shape of the kitchen island
- Measure the available space in your kitchen.
- Take accurate measurements of the area where you plan to install the island.
- Consider the space needed for walking and working around the island.
- Decide on the dimensions.
- Determine the width and length of the island based on your kitchen’s layout.
- Consider the standard kitchen island height, typically around 36 inches.
- Select the shape of the island.
- Choose from common shapes such as rectangular, square, L-shaped, or custom designs.
- The shape should complement the kitchen’s layout and traffic flow.
- Measure the available space in your kitchen.
- Choosing the location within the kitchen
- Assess your kitchen layout.
- Identify areas with enough space for the island without impeding movement.
- Consider the proximity to existing kitchen features like the stove, sink, and refrigerator.
- Determine the island’s function.
- Decide if the island will primarily serve as a workspace, dining area, or a combination of both.
- Ensure the location aligns with its intended use.
- Account for utilities and services.
- Plan for plumbing and electrical connections if the island will have a sink or appliances.
- Ensure easy access to power outlets and plumbing lines.
- Assess your kitchen layout.
- Selecting a design style
- Explore design options.
- Research various kitchen island designs, from modern and minimalist to rustic and traditional.
- Consider the overall style of your kitchen and home.
- Choose materials and finishes.
- Decide on the materials for the base, such as wood, metal, or a combination.
- Pick a countertop material that complements the overall aesthetic (e.g., quartz, marble, wood).
- Select a paint or stain color that matches your kitchen’s color scheme.
- Incorporate additional design elements.
- Add decorative features like beadboard paneling, corbels, or decorative brackets.
- Consider integrating open shelving, wine racks, or other functional design elements.
- Explore design options.
- Creating a budget for the project
- List all the expenses.
- Compile a detailed list of materials and tools required.
- Include costs for countertop, base materials, paint, hardware, and any additional features.
- Research prices.
- Compare prices for materials and appliances to find the best deals.
- Account for any professional help you might need.
- Set a budget and stick to it.
- Determine the total budget for your kitchen island project.
- Allocate funds for each component of the island, including a contingency for unexpected expenses.
- List all the expenses.
Gathering Materials and Tools
- List of materials needed
- Base materials:
- Wood boards
- Plywood
- Screws or nails
- Countertop materials:
- Countertop material (e.g., butcher block, granite, quartz)
- Adhesive or fasteners
- Paint and finishing materials:
- Primer
- Paint or stain
- Sealant or varnish
- Additional materials:
- Cabinet hardware (handles, knobs)
- Optional features (e.g., shelves, drawers, electrical outlets)
- Base materials:
- List of tools needed
- Measuring tape
- Circular saw or miter saw
- Screwdriver or drill with appropriate bits
- Level
- Clamps
- Sandpaper or sander
- Paintbrushes or paint sprayer
- Safety equipment (safety glasses, ear protection, dust mask, etc.)
- Workbench or sawhorses
- Plumbing and electrical tools (if needed)
- Optional tools for specific features (e.g., drawer slides, router for decorative edges)
- Tips for selecting high-quality materials
- Choose durable and sturdy wood for the base, such as oak or maple.
- Select countertop materials that are resistant to stains, heat, and moisture.
- Ensure that screws or nails are of the appropriate size and type for your project.
- Research and compare the quality of paints, stains, and sealants for a lasting finish.
- Consider the aesthetics and functionality of cabinet hardware and other features.
- If incorporating electrical outlets or USB ports, use high-quality, code-compliant components.
- Invest in safety equipment to protect yourself during the construction process.

Building the Base: How to Build a Kitchen Island
- Cutting and assembling the frame
- Measure and cut the wood boards to create the frame of the base.
- Assemble the frame using screws or nails, ensuring it is square and level.
- Reinforce the joints with corner brackets for added stability.
- Use clamps to hold pieces together while fastening.
- Adding legs or wheels for mobility (if desired)
- Determine if you want legs or wheels on your kitchen island.
- Attach legs at each corner for a stationary island or wheels for mobility.
- Make sure they are securely fastened to support the weight of the island.
- Attaching the base to the floor
- Position the base in the desired location within the kitchen.
- Use a level to ensure the base is even and level with the floor.
- Secure the base to the floor by screwing it into the subfloor or using appropriate anchors.
- Priming and painting the base
- Sand the wood surfaces to prepare them for painting.
- Apply a coat of primer to help the paint adhere better.
- Allow the primer to dry completely before applying the paint.
- Apply 2-3 coats of paint, letting each coat dry before the next.
- Consider using a paint sprayer for a smooth and even finish.
By following these steps, you will create a sturdy and well-finished base for your kitchen island. The choice of legs or wheels depends on your mobility needs, and proper attachment to the floor ensures stability. The paint job not only adds a protective layer but also enhances the aesthetic appeal of your kitchen island.
Installing the Countertop
- Measuring and cutting the countertop to fit
- Measure the dimensions of the base to determine the exact size of the countertop.
- Mark the countertop material for cutting using a straight edge and pencil.
- Use a circular saw or appropriate cutting tool to carefully cut the countertop to the desired dimensions.
- Securing the countertop to the base
- Apply adhesive or fasteners to the top of the base.
- Carefully place the countertop onto the base, ensuring it aligns properly.
- Use clamps to hold the countertop in place while the adhesive dries or fasten it securely with screws from underneath.
- Wipe away any excess adhesive that may have squeezed out.
- Options for countertop materials
- Butcher block: Requires periodic sealing to prevent staining and warping.
- Granite or quartz: Durable and low-maintenance, but may need professional installation.
- Laminate: Affordable and easy to clean, available in various colors and patterns.
- Concrete: Provides a unique look and can be customized but requires sealing.
By carefully measuring, cutting, and securing the countertop, you’ll ensure a snug and stable fit. The choice of countertop material should align with your aesthetic preferences and maintenance requirements, so consider these factors when making your selection.
Adding Storage and Features
- Installing shelves or cabinets
- Measure and mark the desired location for shelves or cabinets on the base.
- Attach shelf brackets or cabinet support hardware to the base.
- Install the shelves or cabinets onto the brackets, ensuring they are level.
- Secure them in place using screws or fasteners.
- Adding drawers or storage compartments
- Determine the location for drawers or compartments within the base.
- Install drawer slides or hardware according to the manufacturer’s instructions.
- Assemble and install drawers or storage compartments, ensuring they slide smoothly.
- Test their functionality and adjust as needed.
- Incorporating electrical outlets or USB ports (if desired)
- Plan the location of electrical outlets or USB ports in the base.
- Hire a licensed electrician if you’re not comfortable with electrical work.
- Install the outlets or ports following safety guidelines and local codes.
- Ensure the wiring is hidden and properly secured.
- Decorative features and personalization
- Add decorative elements such as beadboard paneling, corbels, or decorative brackets to enhance the island’s appearance.
- Customize the island with features that suit your needs, such as a built-in wine rack, spice racks, or pull-out trash bins.
By incorporating storage and features into your kitchen island, you’ll enhance its functionality and make the most of your space. Careful planning and installation ensure that these elements not only serve practical purposes but also contribute to the overall design and convenience of your island.
Finishing Touches
- Installing shelves or cabinets
- Measure and mark the desired location for shelves or cabinets on the base.
- Attach shelf brackets or cabinet support hardware to the base.
- Install the shelves or cabinets onto the brackets, ensuring they are level.
- Secure them in place using screws or fasteners.
- Adding drawers or storage compartments
- Determine the location for drawers or compartments within the base.
- Install drawer slides or hardware according to the manufacturer’s instructions.
- Assemble and install drawers or storage compartments, ensuring they slide smoothly.
- Test their functionality and adjust as needed.
- Incorporating electrical outlets or USB ports (if desired)
- Plan the location of electrical outlets or USB ports in the base.
- Hire a licensed electrician if you’re not comfortable with electrical work.
- Install the outlets or ports following safety guidelines and local codes.
- Ensure the wiring is hidden and properly secured.
- Decorative features and personalization
- Add decorative elements such as beadboard paneling, corbels, or decorative brackets to enhance the island’s appearance.
- Customize the island with features that suit your needs, such as a built-in wine rack, spice racks, or pull-out trash bins.
By incorporating storage and features into your kitchen island, you’ll enhance its functionality and make the most of your space. Careful planning and installation ensure that these elements not only serve practical purposes but also contribute to the overall design and convenience of your island.
Safety and Maintenance
- Safety considerations during construction
- Wear appropriate safety gear, including safety glasses, ear protection, and a dust mask.
- Ensure proper ventilation when working with paints, stains, or sealants in a well-ventilated area.
- Use caution when operating power tools and follow manufacturer’s instructions.
- Keep the workspace clean and organized to prevent tripping hazards.
- Secure heavy materials and tools to prevent them from falling.
- Safety of the finished kitchen island
- Ensure the island is stable and level, avoiding wobbling or tipping.
- Smooth out any sharp edges or corners that could pose a safety hazard.
- If the island includes electrical outlets, ensure they are installed by a licensed electrician and meet safety codes.
- Maintenance guidelines for the countertop and base
- Clean the countertop regularly with a mild detergent and water to remove stains and spills.
- Depending on the material, reseal or refinish the countertop as recommended (e.g., butcher block and granite may require periodic maintenance).
- Check and tighten any loose screws or fasteners in the base to maintain structural integrity.
- Repair any scratches, dents, or dings in the base’s paint or finish to prevent further damage.
- Keep the island clean and free from clutter to avoid accidents.
- Cleaning and care instructions
- Follow the manufacturer’s care instructions for specific countertop materials.
- Avoid using abrasive or harsh cleaning products that could damage the countertop.
- Use cutting boards and trivets to protect the countertop from heat and knife marks.
- Regularly inspect the island for any signs of wear or damage, addressing issues promptly.
By prioritizing safety during construction and adhering to maintenance guidelines, your kitchen island will remain a functional and safe addition to your kitchen. Regular upkeep and care will also extend the lifespan and preserve its appearance for years to come.
Additional Guide
Explore the world of refreshing beverages with our guide on “How To Make Cold Brew Tea.” Discover the simple steps to create this delightful and chilled tea, perfect for hot days. For more culinary tips and kitchen insights, visit One Kitchen Review.
Conclusion: How to Build a Kitchen Island
Building a kitchen island can enhance your kitchen’s functionality and add a personalized touch to your home. We’ve created a comprehensive guide to help you create a kitchen island that suits your needs. We cover choosing the right size, shape, and location, selecting a design style, and creating a budget.
We also provide detailed instructions for constructing the base, adding features, and ensuring safety. Remember to take your time, follow best practices, and seek professional assistance if needed. With this guide, you can create a beautiful and functional kitchen island that simplifies your daily routines. Hopefully now you know how to build a kitchen island after follow our guide.